Showing posts with label Lapbooks. Show all posts

Thursday, August 15, 2013

Making Shaped Books with PSE

Last week we spent five days introducing you to the idea of using Photoshop Elements in your homeschool.  If you missed any of those topics, here they are:

Quick Pages for Journaling/Notebooking

Multi-Layered Templates for Recordkeeping

The Type Tool for Flashcards and Labels

PDF Templates for Lapbooking

Extracting Images for Posters

When we last discussed lapbooking, we were relying on someone else to provide us with the shape of the mini-book and just adding our our text and images.  What if you want to make your own mini-book and what if you’re bored with simply squares or rectangles.  Let’s learn how to make a shape book next.  For our example I’m going to make an apple book for Johnny Appleseed.  I start by Googling an apple clip art image.

Here’s a good one and I can tell from the checkerboard pattern that the background is already transparent so I won’t have to extract the image.

Wow, look how big the apple was when I dragged it onto my 8.5X11 blank file.  I didn’t notice the image size when I was Googling.  I’m working with it anyway because it’s easy to make a large image smaller.  (If you start with an image that’s too small and try to stretch it out, it can look really pixelated).  I resize the apple by dragging on a corner and place it on the right side of my blank background.  Now I’m going to use Photoshop Elements Stroke feature to make the back page of my mini book.

You’ll see “marching ants” around the apple in the work area.

The new layer will appear above the old one in the layer section and the marching ants will still be around the apple (they’re really around the new copied apple).  Now click on Edit>Stroke (Outline) Selection. A new window will pop open.

We’re making the cutting line for the back of the mini-book so we want it to be several pixels wide and black in color.  I leave it centered so that when I cut down the middle of the line it will match up perfectly with the front side.  With your width and color set, go ahead and click OK.  There’s now a black outline on top of the apple, but we need to reverse the image. Select Image>Rotate>Flip Layer Horizontal.

Now the outline of the apple is a mirror image of the original.  If you try this and can’t tell the apple image from the outline, you’ve probably selected the plain Flip Horizontal instead of the Flip Layer.  Make sure the Move Tool is highlighted on the left hand side but DON”T use your mouse to move the outline shape.  We want to keep it on the same level as our apple so it will match up when we fold the book..  Instead use your left arrow key to nudge the outline over.  There should still be some overlap—this will be the fold of the book where the front and back stay connected. Too small an area and the front will likely tear off with use. 


See how the outline is on the face of our mini-book.  We don’t want that.  It’s easier to deal with than you think.  We just need to change the order of our layers.

Now there’s a portion of the red apple will appear on the back page of our book, but I don’t care since that side will be glued down anyway.  Here’s the image of the finished shape book after I’ve added my text.

Next week I plan to go into more detail about the Magic Extractor feature—using the zoom and changing brush size to get those tiny details.  If there are any projects you’d like to learn to tackle with Photoshop Elements, please leave me a comment.

Tuesday, December 11, 2012

Mystery of History 2 Lapbook

My son and I have been working through MOH Volume 2 this year.  For those of you unfamiliar with the product, there is a lot of built in review through cumulative quizzes and what the creator refers to as memory cards.  Each index card is supposed to list the lesson subject, date, and important facts.   I suppose I could have jazzed up the cards with a picture on the back side, but I was looking for something more eye-catching so my son might look at it on his own to refresh and review.  One day while visiting the Bright Ideas Press website, I saw that they offered lapbooks for sale.  Maybe this was what I was looking for.  Unfortunately I couldn't find any sample pictures either on their web store page or  the MOH Yahoo Group forum.  I took a chance and bought it blind.

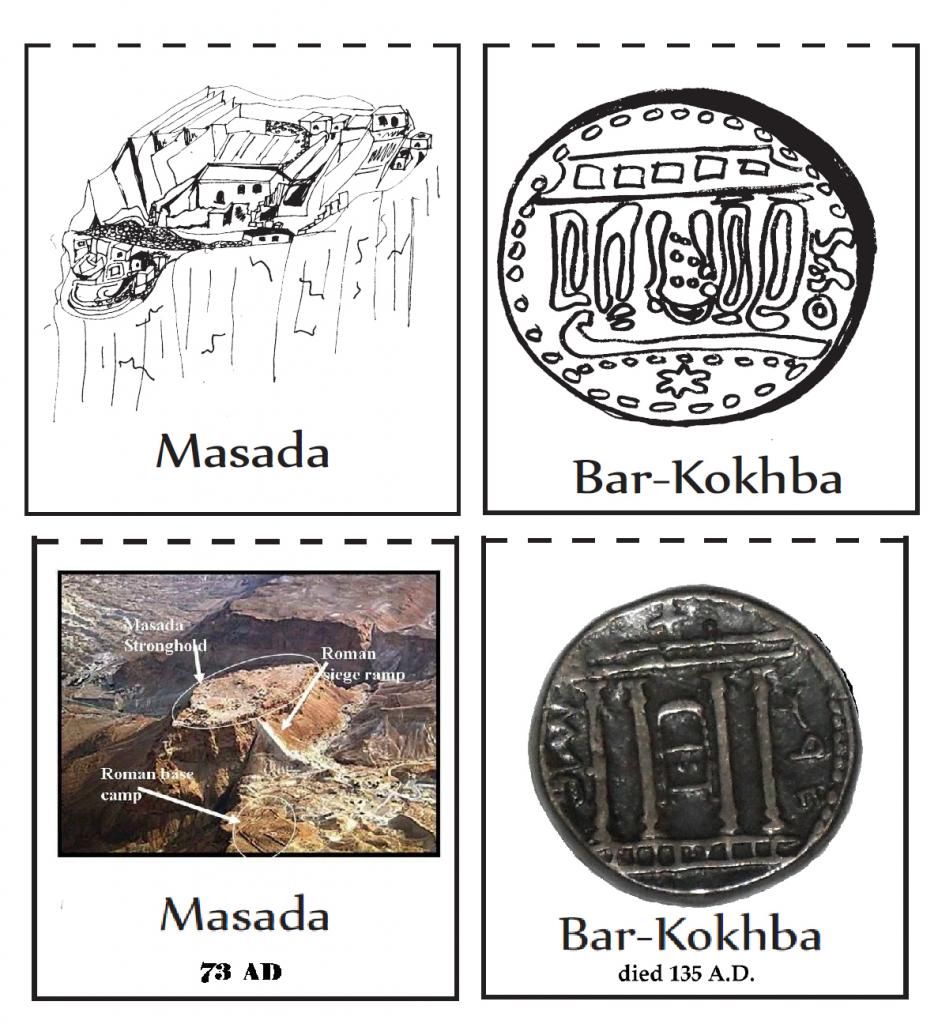
Here is a picture showing how to assemble the official lapbook.


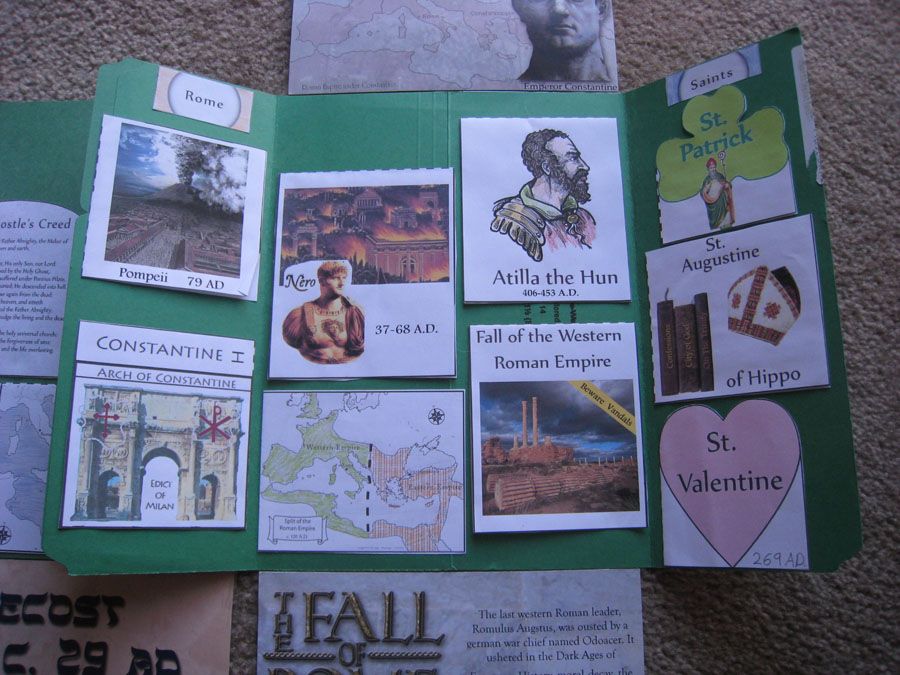
I'm glad to have the sample so I can organize the lapbook (note how they grouped the Jewish history lessons together and the Roman lessons together).   I was surprised/disappointed that the graphics for the minibooks weren't from the textbook.  I guess they couldn't get permission to use the Homeschool in the Woods images.  Instead most of the pictures looked like they were drawn by kids. There were also a few (only two in the first quarter) lessons that didn't have a minibook.  So using the sample pictures as a starting point, I decided to make my own lapbook pieces.  I scoured the Internet to find images ( I didn't have to worry about copyright issues) or used images from my purchased copy of History Through the Ages figures.  I used my Graphic Toolbox and Photoshop Elements to create my own minibooks or add color to the ones I used from the MOH lapbook.

Official images on top, my substitutions below

The results are much more colorful and I was able to make minibooks for the missing lessons (like the Golden Age of India) and put them on what would have been an unused flap.  I also added the posters I made for the Dates to Remember.  Here's our first quarter Lapbook....


Tuesday, March 27, 2012

Let's Make a Lapbook: Planning


I'm planning on squeezing in Exploring Creation with Botany this summer.  We skipped this book in the series and I want to do it in the summer when we can actually grow some things.  I realize that I could purchase the Notebooking Journal for this title or one of several commercial lapbook kits, but I've decided to make my own and I'm taking everyone along for the ride.  We'll learn together (hopefully not from mistakes) how to plan and design a lapbook.  I developed my own planning page and you can download your own copy here.
Lapbook Planning Page


 Today I'll be reading through the first chapter and deciding what to include.  The obvious place to start is with the vocabulary words.  Apologia makes this very simple by printing them in BOLD text, but they've also formatted a few other words this way (and I don't think my son needs more than 8-10 vocabulary words) so I'll be selective.  For example, the words kingdom, phylum, class, order, family, genus and species all appear in bold but the text really never explains what a phylum is.    These terms would be better used in a mini book explaining taxonomy.  The text also bolds the words xylem and phloem but then mentions they'll be covered in a future lesson so I won't include them now.  The planner page I created has space for twelve words so I may list some and cross them off later.  For lesson One I found the following:

  • Botany
  • Biology
  • Classification
  • Binomial Nomenclature
  • Vascular
  • Angiosperms
  • Gymnosperms
  • pod
After addressing vocabulary,  I look for the author's hints about what key information my child should be learning/remembering.  So far all the Young Explorer Series books have had chapter sections titled "What Do You Remember?"  These are usually a list of questions--our job is to translate that into a mini book form.  Some questions simply ask for the definition of a term (we've already taken care of that in our vocabulary section).   A better mini-book topic is "Why do scientists use Latin?"  I write the question on my planner page.  This is a simple, 1-unit book.  I'll write the question on the front and try to include a picture (maybe even scan the Roman boy from the book) and then Schnickelfritz can write his answer inside.  Other concepts may need two parts, like comparing/contrasting the human vascular system to a plant vascular system.  I'm still trying to come up with a plan to cover the seven levels of taxonomy but I've put a little sketch in the mini book template area as a starting point.


Once I've got my list of mini books, I can search the Internet and my saved files for mini book templates that will fit the bill,  but we'll save that for another post...

Monday, April 11, 2011

Show Me Missouri

A fellow Homeschool Crewmember was looking for volunteers to write a little information about their home states for her blog. Since I was already gathering information about our state's history to teach Schnickelfritz next year I volunteered to share about Missouri.

Father Marquette, a Jesuit priest, and Louis Jolliet, a French explorer are credited as the first two white men to lay eyes on the land that would be called Missouri while travelling south on the Mississippi River. According to Marquette's journal---
….we heard the noise of a rapid, into which we were about to run. I have seen nothing more dreadful. An accumulation of large and entire trees, branches, and floating islands, was issuing from the mouth of the river Pekistanoui [Missouri], with such impetuosity that we could not without great danger risk passing through it. So great was the agitation that the water was very muddy, and could not become clear.

Pekitanoui is a river of considerable size, coming from the northwest, from a great distance; and it discharges into the Mississippi. There are many villages of savages along this river, and I hope by its means to discover the Vermillion or California Sea. Judging from the direction of the course of the Mississippi, if it continues the same way, we think that it discharges into the Mexican Gulf. It would be a great advantage to find the river leading to the Southern Sea, toward California; and, as I have said, this is what I hope to do by means of the Pekitanoui, according to the reports made to me by the savages. From them I have learned that, by ascending this river for five or six days, one reaches a fine prairie, twenty or thirty leagues long. This must be crossed in a northwesterly direction, and it terminates at another small river, on which one may embark, for it is not very difficult to transport canoes through so fine a country as that prairie. This second river flows toward the southwest for ten or fifteen leagues, after which it enters a lake, small and deep, which flows toward the west, where it falls into the sea.  I have hardly any doubt that it is the Vermillion Sea, and I do not despair of discovering it some day, if God grant me the grace and the health to do so, in order that I may preach the Gospel to all the peoples of this new world who have so long grovelled in the darkness of infidelity.

Father Marquette wasn't the only man with aspirations to find a water route to the West. Over one hundred and thirty years later President Jefferson would send Lewis and Clark and the Corps of Discovery up the Missouri River in search of the same goal. The most famous landmark in Missouri—the St. Louis Arch commemorates Jefferson's vision and Missouri's role as a "Gateway to the West."  Missouri was the starting point for both the Sante Fe and Oregon Trails.  The starting point for the famous but short-lived Pony Express  was St. Joseph,  Missouri.


Along with Western Expansion, a great overlap between Missouri and United States history is the issue of slavery.   Missouri  territory wanted to form a state government and seek statehood but that would have thrown off the balance of power between slave-holding and free states.  In 1820, the Missouri Compromise allowed the territory to form a government and write a constitution but prohibitted slavery in any of the origianl Lousiana territory north of the 36 30' parallel.   Later, this legislation was declared unconstitutional by the Supreme Court in the Dred Scot case, stating that the congress  didn't not have the authority  to prohibit slavery in U.S. territories.   (Incidently, even though the steps of the Old Courthouse in St. Louis was often the site of slave auctions, a jury there originally found in favor of the Scots' freedom). 


[caption id="" align="aligncenter" width="547" caption="The Old Courthouse"][/caption]

During the Civil War Missouri remained loyal to the Union although it continued to allow slavery.  This border state was truly the site of brother fighting against brother.  More that 100 battles or skirmishes took place in the state--making it the third most active state after Virginia and Tennessee.


Friday, May 1, 2009

Our first Lapbook

I've been wanting to try a lapbook with my schnicklefritz to see how he takes to the idea.  Like many boys, he's not excited about writing so we keep it in small portions.  He needed to make a poster for Royal Rangers and I decided to alter the project into a lapbook.


Here is the cover.  We scanned an image from the handbook and enlarged it.  Fritz cut the circle out with one of my scrapbooking tools.


On the left hand side are the blue points of the Ranger code.  The four pledges can be unfolded on the right and a blue pocket hold all his Bible verses for the year.  I penciled in the words to give Fritz an idea of their size and spacing then he wrote everything with a Sharpie marker.


Under each blue point flap is the part of the code he must memorize.  I typed everything and he cut it out.  I ran it through the xyron and he applied it.


I hope you can see how everything unfolds.  I typed the pledges and found clip art to identify each one.  Fritz cut out the texts and decided where everything would be placed.  I helped cut out the clip art to make sure it would fit on the flaps.


This is supposed to be a reviewing tool so we laminated the Bible verses.  Now he'll be able to pull them out and we can go through them together.

His commander loved the lapbook and wants to put it up on the church bulletin board.  It's our first one, so I'm reluctant to part with it.  Maybe we'll let her display it for a little while.  If it gets damaged, at least it is documented here.


Related Posts Plugin for WordPress, Blogger...