It was my turn again to host our Apologia science  co-op as we wrapped up Lesson 7 in Human Anatomy and Physiology. The experiment in the book is to type your own blood. Blood Typing kits run about $10-13 each--too rich for for everyone in our co-op to have their own. There also seemed to be sighs of relief around the table when the boys learned I wouldn’t need any volunteers (we did buy one kit, more on that later). I needed several other activities to keep the boys busy (our one girl was recovering from surgery--Get Well Soon E.M.!). Here's what we did....
Activity #1 How much blood?
Our book says that the average human has 5 liters of blood. I set out all my kitchen bowls and had the boys guess which one held that amount. I didn't even tell them that a liter is a little bit more than a quart. Three boys picked the right bowl, one went to the largest and one went smaller. I poured 5 liters in to show it filled it to the brim.
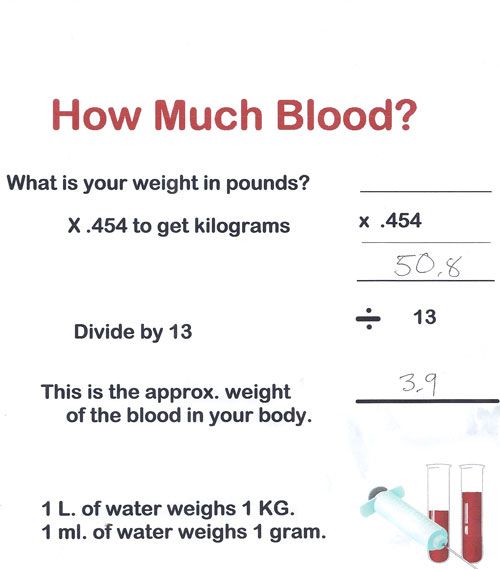
 Then we set out to figure how much blood was in their bodies. I kept things in the metric system so we could compare liters to liters (it also help that 1 liter of water weighs 1 kilogram). I made this worksheet for the boys including a step to convert from pounds to kilograms but before we started the lab I found a switch on the bottom of my scale to measure kg so we were able to skip that step.
My Vita-Mix pitcher holds two liters and has metric measurements on the side so we were able to pour & fill the bowls appropriately (there was some disappointment that the water wasn’t colored red so feel free to add this for accuracy).
Activity #2 Determine Blood Types
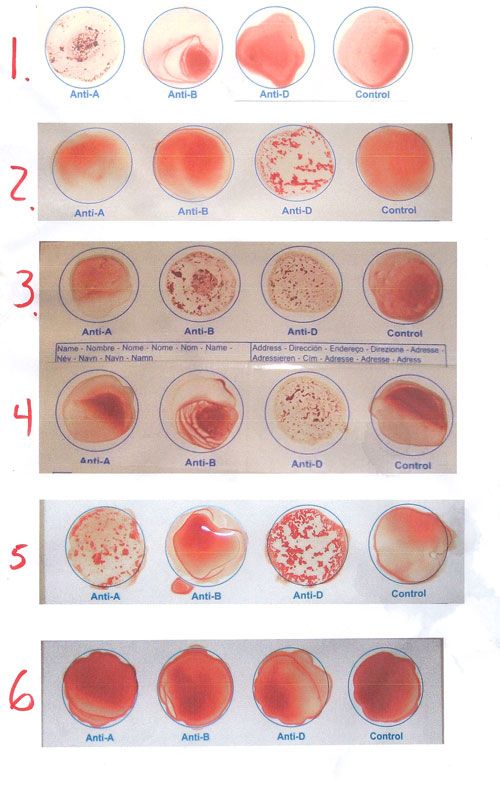
I did buy one kit for my husband the Toolman to use since we don't know his type. He used the kit the night before and we let the kids compare his test to the chart. The results--well we know he's positive but there may have been a weak reaction in the A type. We're saying O+ for now but may need a real lab to be certain. Because of the iffy results I searched online for other folks' blood type tests (and yes, people have posted them). I copied and pasted six on a page for the kids to analyze--and that's really the point of the experiment, not learning what it feels like to prick your own finger.

I also shared statistics from the American Red Cross on what percentage of the population has specific blood types. Being O- with a mother and grandmother the same, I had know idea that it’s a fairly rare type.
Activity #3 Determine compatibility
(I apologize up front for no pictures of this activity, but it’s hard to run it and document it at the same time. Next time I’ll put Schnickelfritz in charge of the camera).
Of course the point of knowing your blood type is to know to whom you can donate blood and from whom you can receive blood without a bad reaction. I filled four plastic cups with water. The first I left plain and labeled O. The second and third were dyed blue and red and labeled A and B respectively. The final cup turned purple (both blue & red) and represented AB. I couldn't figure out a way to incorporate rh factor into the activity so we just concentrated on types.
The I place a glass bowl on the table to be our "patient." We took turns make the patient different types and “transfusing” different blood with a dropper. Here are some tips: Make the patient liquid as pale as possible and the donor liquid dark so it will make a change when dropped in the glass jar. If you’re using donor blood that is the same type as the patient blood it may make it darker but blue will still be blue and red will still be red. Keep extra “patient” liquid on hand because once it’s changed you’ll need to discard it and start with pure color again. I also rinsed our dropper between “transfusions.”
Next week’s activity will involve a real heart – saved & frozen after one of the boys shot his first deer last fall. I’m not in charge so maybe I’ll have a chance to take pictures.
Don't miss a thing! Subscribe to Ozark Ramblings and get my posts in your inbox.

1 comment:
Excellant posting, one that concerns every person for sure!
Post a Comment