

Welcome the last official day of 5 Days of Photoshop Elements for School (but come back next Thursday for a tutorial on making shape books ). Ironically, we’re really going back to the beginning of my whole interest in digi-scrapping for school. It started last year when I read the post Faster than a Lapbook, More Fun than a Book Report! at Heart of Wisdom. There were plenty of student samples to look at as well—covering science concepts, biographies, events in history, Bible stories and more.

At the time Fritz was studying Mystery of History and had 12 dates to memorize. I really wanted to make those dates stand out in his mind so rather than just highlight a little timeline figure, I made page-sized posters to put above our timeline on the wall. When we were done, we attached the posters as extra flaps in our quarterly lapbooks.
I made the posters 8 1/2 by 11 so I could print them at home (my printer allows for edge to edge printing). This really isn’t a bad size for a homeschool room – it’s not like I’m trying to show it to 30 kids at once.
If you’ll look at the sample images, you’ll see that instead of framed pictures, I have objects like the scroll and the Vandal warrior appearing to be placed directly on the image background. I did that through a process called selecting and extracting, which is the focus of today’s tutorial. There are several ways to accomplish our task so lets start with one of the easiest.
For our first example let’s see if we can extract the Lewis & Clark compass from this image.
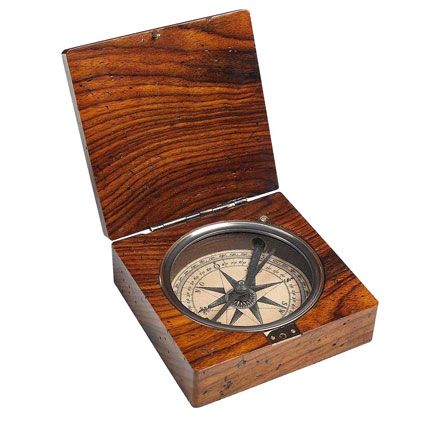
We are very fortunate that the background is all one color—there’s not even a shadow from the compass. We can make PSE do most of the work for us. After opening the image in the Editor, I’ll make a new blank file but this time I want the background color to be transparent so I click that box in the pop up window. If I know the size of my image I can make the blank file the same size, if not, I can always crop it down later. Next I’ll open my file of the compass and drag it from the Project Bin onto my blank file.
Now I’ll verify that the layer with my compass image is active and I’ll choose the Magic Wand tool from
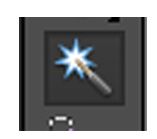 the left hand side. It does look like a wand lit up at one end. The mouse changes to a sparkly wand as well. Now I click somewhere in the white background of the compass image.
 Around the outside edges of the white square and around the compass are little marching ants.
Then it’s just a matter of hitting the Delete key. I can save the compass with the transparent background for later or drag the thumbnail from the Project Bin onto the Lewis & Clark Poster I’m working on.
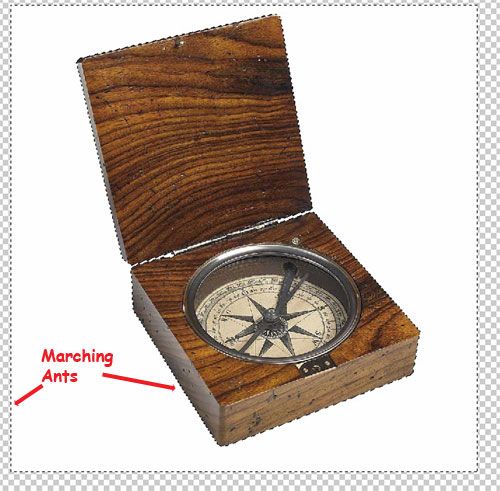
Of course, there are a lot of images that aren’t that cut and dried—like this image of Joan of Arc.
I’d like to just use Joan and her banner but leave out the distracting gold background. In this case the background isn’t a solid color so the Magic Wand won’t work. I’m still going to let PSE do most of the work, it just needs a little more guidance in what parts should stay and what should go. I start a new blank file with transparent background and drag my Joan image onto it.
Now I’m going to select Image>Magic Extracter. Joan’s image appears on a new work surface with it’s own set of tools. I’m only going to mention the first two tools today. There's a lot more detail like changing brush size, zooming in, getting back portions you didn't want removed, etc. but I'll save the details for another tutorial.

When I finish coloring over my image I use click on the Preview button and change this …..

To this!

Which I can then drag onto my Date to remember poster.
I hope you enjoyed these 5 Days of Photoshop Elements for School and I hope you've learned something! Come back next Thursday for a tutorial on making lapbooking shape books.

9 comments:
We don't really do posters but as a MoH fanatic I love this idea!
I think yours has been my favorite series in the blog hop. I haven't had time to really soak it all in, but I have it bookmarked. Thanks for writing it!
Wow! That is really neat.
Thanks for the kind words ladies. It's been a labor of love.
This is so awesome! I am going to have to come back to it slowly and practice piece by piece, but thank you, this is stuff I've always wanted to know how to do!
Thanks for tutorial! This looks great.
Those posters are great. I need to come back and work through this slowly with a poster of my own.
Wow, that is beyond my skills, but my son would love it!
Melanie, I've thought about letting my son do something like this instead of a written report to show what he's learned. I won't have the whining about having to write and he'll be picking up a marketable skill.
Post a Comment